Tag Archives: recipe

Project Wedding Cake

Hi all! Its been a hectic past week for me because MY BEST FRIEND GOT MARRIED TWO DAYS AGO. It was an exciting and happy event, filled with dancing and eating and general fun. And as you’ve guessed from the title of this post, I was asked to make the wedding cake. She only asked me a month before the wedding, and at first I was very nervous about it. I’ve never made a great tasting layered cake before, and the ones I have made usually 1) don’t look so great, and 2) don’t taste awesome. Thankfully though, I’ve made bad layered cakes before, so I knew what to watch out for. Thus started my journey of making a perfect wedding cake for my best friend.

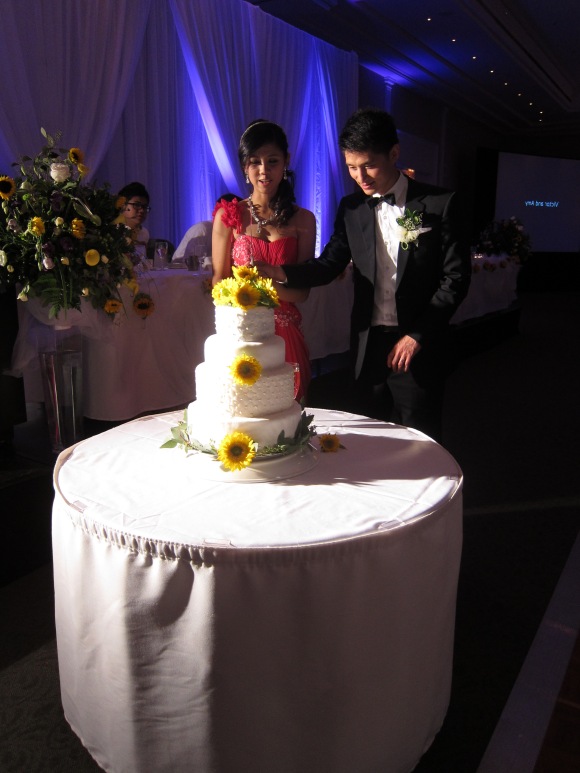
Bride and Groom with the wedding cake

Bride and Groom with the wedding cake

Wedding cake:

One of my most trusted recipe blog sites is Smitten Kitchen, so I headed over right away to find a wedding cake recipe. Finding a wedding cake recipe is important because cakes tend to be heavy, and stacking them usually results in a dense cake. Although there is that fine balance between texture and being stackable, it was more important that my cake didn’t crumble under its own weight. Thankfully, Deb has made a wedding cake before, and her recipe is delicious. I decided to make both cakes, although I quickly realized the chocolate cake is very tender. My friend asked for a two-tiered cake, and although I would much prefer to have lots of chocolate cake for the bottom tier, I was afraid that the cake would not hold. Thus, I decided the bottom would be the yellow butter vanilla cake and the top would be chocolate cake. One of my baking habits is to NOT use vanilla unless the flavor of vanilla is a prominent feature (such as creme brulee), and that back fired on me on the big (baking) day. I forgot to use vanilla on the cake. =( Fortunately, the buttercream got some, so it all worked out. My final recipe is:

Yellow Butter Cake (for 8×3 inch cake pan):

  • 300g cake flour
  • 19g baking powder
  • 300g sugar
  • 7.5 oz butter, cubed, slightly chilled
  • 180g buttermilk
  • 48g buttermilk
  • 3 eggs
  • 2 egg yolks
  1. Line your cake pan fully with parchment paper.
  2. Add cake flour, baking powder, some salt, and sugar together into a LARGE bowl.
  3. Using an electric mixer, Cream the butter into the dry ingredients by adding a piece of butter at a time. This helps the cake rise evenly without doming.
  4. Add the 180g buttermilk to the creamed mixture, and whisk the batter until light and fluffy.
  5. Whisk 48g buttermilk with 3 eggs and 2 egg yolks.
  6. Add egg mixture in to the batter. Mix until smooth. Pour into cake pan.
  7. Bake at 325C for 1 hour and 20 minutes

Chocolate Cake (for 6×3 inch cake pan):

  • 180g hot water for coffee/cocoa mix
  • 64g cocoa powder
  • 3 tbsp instant coffee/ espresso powder / strong coffee
  • 180g cake flour
  • 225g sugar
  • 10g baking soda
  • 5g salt
  • 6oz butter, cubed, slightly chilled
  • 144g buttermilk
  • 1 1/2 eggs (24 g = half an egg)
  1. Line your cake pan fully with parchment paper.
  2. Make strong coffee using 180g hot water. This could mean brewing your own coffee, or using a couple of packets of espresso powder in water. I typically do 3 tbsp of instant coffee. Just taste the coffee – you want it to be fairly bitter.
  3. Add the 64g cocoa powder into the strong coffee and mix. There will be clumps but don’t worry about it.  Set aside.
  4. Again, cream the cake flour, sugar, baking soda, salt with cubed butter using an electric mixer.
  5. Pour the 144g buttermilk in to the creamed mixture again, and whisk until light and fluffy. You can add some of the coffee/cocoa mixture in as a reference to see when the batter has become lighter.
  6. Add 1 and 1/2 eggs into the coffee/cocoa mixture, and whisk until smooth.
  7. Pour coffee mixture into cake batter, and mix until smooth.
  8. Pour batter into 6×3 cake pan, 3/4ths high up. There will be tons left over, so I typically pour the rest into a pyrex dish and bake it as well.
  9. Bake at 325C for 50 minutes

Fillings:

The next thing to decide was flavors. At first I just wanted to be boring and use buttercream between the layers. However, upon reading all of Deb’s post for the wedding cake she made, I was inspired to do lemon curd for the yellow butter cake and raspberry for the chocolate layer. I knew the bride liked lemon tarts (cause I made her one a few months ago), and raspberry with chocolate is always a good combo. I opted for using Serious Eat’s lemon curd recipe (without the strawberry part). The raspberry part took a little more fiddling with. My recipe ended up being 200g frozen raspberries, 50g sugar, 30g corn starch (dissolved in minimal water) and created a congealed raspberry glob that was thick enough to create a nice, thick layer of raspberry in between the chocolate cake layers. The congealed part was important because I didn’t want the sauce to be flowing out of the cake once the layers were stacked on, and I found that unless the raspberry layer was thick, its flavor was not very prominent as I had hoped.

Project Wedding Cake 2

Buttercream:

To my dismay, the buttercream recipe Deb provides at Smitten Kitchen tastes like butter. And while that is awesome for cake making, eating a cake with that buttercream recipe tasted like I was rubbing my mouth down with sticks of butter. My favorite buttercream recipe is from the book The Science of Good Cooking (Cook’s Illustrated Cookbooks) (which I HIGHLY recommend), but it is unfortunately at the bottom of my many boxes that are waiting to be moved to Chicago. So I turned to Serious Eats for another recipe. I don’t always count on Serious Eats for good baking recipes, but since it came with a slideshow regarding the technique to creating buttercream, I went along with it. The fact that it called for egg whites in grams also made it seem very promising. It turned out to be utterly delicious, and it is now my new favorite. Although the recipe calls for 1 lbs of butter, I typically add just enough butter just to get it to turn from a water-based emulsion to a butter-based emulsion, so the consistency tends to be loose.  This is usually calls for 3 to 3 1/2 sticks of butter. I flavored the buttercream with vanilla extract in the end. The buttercream is not a big part of the flavors of the cake however, because I used just enough to “glue” the fondant to the cake. Which finally brings us to….

Fondant:

What. A. Bitch. Fondant was by far the hardest thing to deal with while making the cake, but to be fair I’ve never worked with fondant prior to making this wedding cake. As for the recipe, I wasn’t choosy so I just went over to foodnetwork.com and found a fondant recipe. Translated into weights, that recipe means 60g water, 1 packet of gelatine (~8g), 170g light corn syrup or glucose, 28g glycerine, and ~2lbs sugar, depending on how much I work in. I think the trick to working with fondant is to try to not work too much sugar in initially, and then use tons of sugar while you are rolling it out to prevent it from sticking to the table/itself. If you add too much sugar into the fondant (rolling it out too many times due to rips, or working too much sugar into the fondant to begin with), the surface of the fondant won’t be smooth and end up looking like elephant skin.

Design:

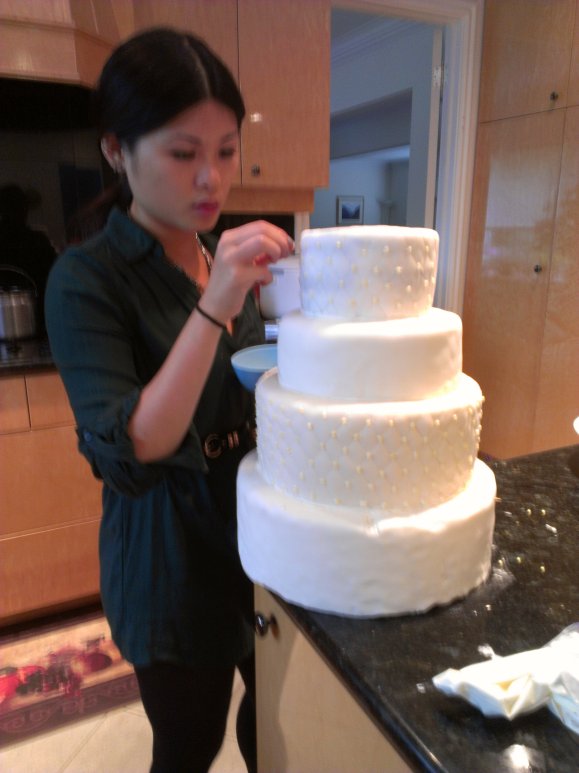
Finally, the most fun part of a wedding cake: design! I chose to go with a simple quilted pattern (like a Channel bag), and used buttercream to glue on pale yellow beads. I cut a cardboard into a triangle, and traced the edge into the fondant using the rounded tip of a butter knife. I used 2.5 cm intervals between each line. The yellow beads the bride got for me from Michael’s. Near the big (baking) day, I was told a two-tiered cake would look tiny on the table, so the bride got me a 10x3inch and 12x3inch Styrofoam fake cakes to cover with fondant. In the end it required 1 1/2 buttercream recipes, 2 1/2 fondant recipes to cover everything properly, since the fake cake portion needed buttercream as well (as glue). The bride also asked her florist to put some flowers on top as decoration.

Tons of thanks to my wonderful helper, Demi Wang

Tons of thanks to my wonderful helper, Demi Wang

And finally, I would like to thank everyone who was encouraged me through this long process of learning how to make a wedding cake, and all of those that I have stuffed the cake down the throats of. 7 cake trials, 6.5 hours on the big (baking) day, and the magic of one florist later, the cake was baked.
Tagged , ,

Tamagoyaki

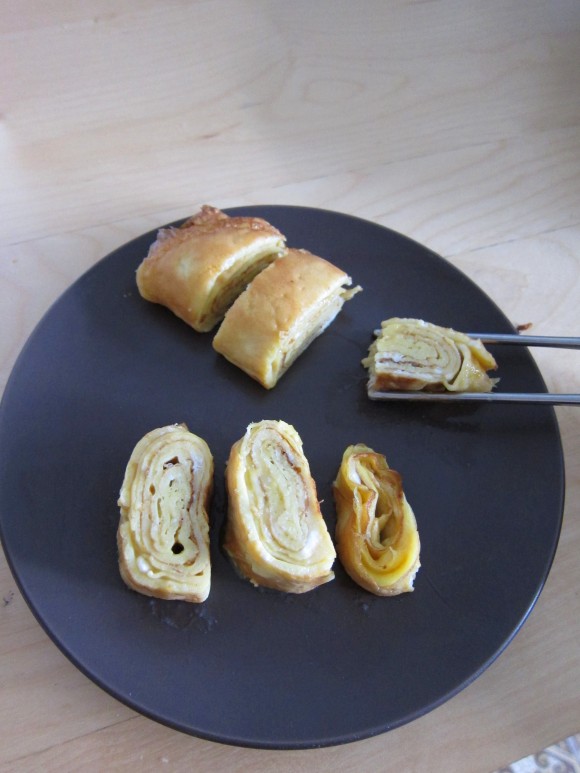
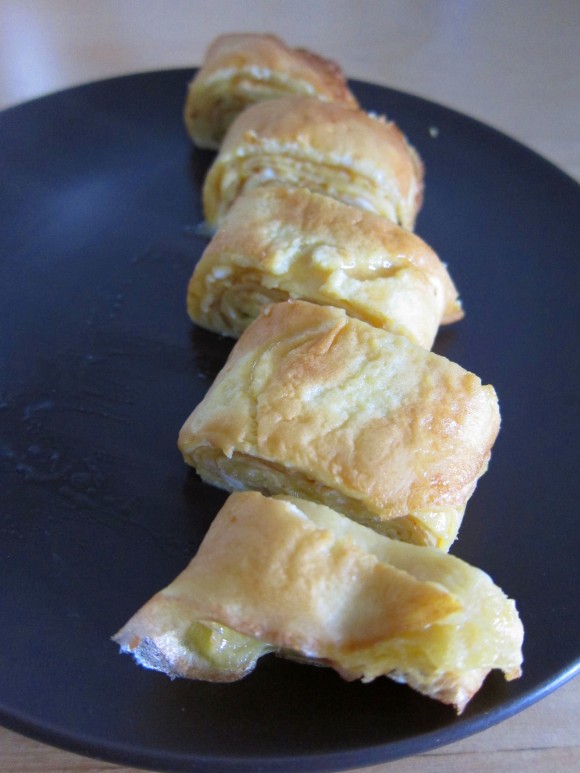
Tamagoyaki 1

Growing up, I’ve always disliked eggs. I remember my mom used to ask us at dinner if we wanted a fried egg for dinner, and I would always say no. Although I grew up liking dan bing (Chinese egg pancakes), it was definitely the bing, or pastry part, that I liked better. Then, after watching a lot of Good Eats, I realized it wasn’t eggs that I disliked, it was overcooked eggs that I disliked. Overcooked eggs are smelly and unctuous, so I always prefer them a little undercooked, at least a little creamy.

Tamagoyaki 2

With that in mind, I tried to make my version of the perfect tamagoyaki. I watched the tamagoyaki video by Cooking with Dog, which is an adorable channel in which a poodle seems to narrate the the steps for making Japanese food while a Japanese women cooks. Anyway, tamagoyaki literally means “fried/baked eggs,” and its typically a rectangular sheet of egg rolled up seasoned with dashi (Japanese fish stock), soy sauce, and sugar. The original recipe called for parsley, but I didn’t want to bother with it because really, who is ever able to taste parsley anyway? I also didn’t have dashi on hand, so I substituted it with some chicken broth powder. After a couple tries, I think I have this recipe down.

Tamagoyaki 3

Ingredients

  • 3 Eggs
  • 3 Tbsp stock of your choice
  • 1 1/3 tbsp sugar
  • 1 tsp soysauce
  • Cooking oil

Note: I use 1 tsp Lee Kum Kee Chicken Bouillon Powder and add it to 3 tbsp water to make the stock

Procedures:

  1. You will need a Tamagoyaki pan, but if you don’t have one a small frying pan is fine, preferably a non-stick one. Heat the pan up with medium heat and add a small bit of oil of your choice
  2. Beat the 3 eggs and add the other ingredients (not including oil). When the pan is hot, use a ladle and add 1 spoonful of the egg mixture. You want to have enough egg mixture to cover a thin layer at the bottom of the pan.
  3. The egg layer should not bubble or sizzle while its cooking. If so, turn down the heat. Give it 2-3 minutes to cook until the egg layer is not liquid, but not necessarily cooked through. Roll the layer up using spatula and chopsticks, making the rectangle roughly 3-5cm wide. Push the rolled up egg to the side of the pan.
  4. Pour another ladle of egg mixture onto the pan, making sure the egg touches the original egg roll. Repeat the process of rolling the egg and pouring the egg mixture. When you are rolling the egg, be careful because the edge of the egg roll and the new egg mixture is fragile, and breaks easily.
  5. Cut into 6 pieces and serve.

Tamagoyaki 4

Tagged ,

Brown Butter Chocolate Chip Cookies

I’ve learned to make very complicated pastries, and I think I can make them pretty consistently. Croissants, souffles, bread, and various cakes, but the one thing I haven’t made successfully is, ironically, cookies. The most basic American dessert. Until this time, all my chocolate cookies have been failures. I had half a bag of leftover chocolate chips from the last time my boyfriend, J, and I tried to make them. But it would be boring to make plain ol’ chocolate chip cookies, and I hate boring. So instead of using normal butter I decided to use brown butter!

Brown butter, or buerre noisette, is easy to make. I learned it here from Poires au Chocolat. Basically its just boiling butter until the water has evaporated and the butter turns amber, kind of like making caramel. Since the chocolate chip cookie I wanted to use called for melting butter, I decided to try browned butter instead. Browned butter has this amazing nutty flavor to it, and it definitely made my cookies more interesting. Browned butter is not suitable for recipes that don’t call for melting the butter because, well, browning it melts the butter! Also, I should note that browning butter removes water from the recipe, which may or may not matter depending on the recipe. I loved the flavor, so perhaps I will use it again the near future (banana bread maybe?).

The original recipe is Alton Brown’s “The Chewy” chocolate chip cookie which can be found here.

Chocolate Chip Cookies 1

Ingredients
  • 4 ounces unsalted butter(1 stick)
  •  6 ounces bread flour
  • 1/2 teaspoon kosher salt
  • 1/2 teaspoon baking soda
  • 1 ounces granulated sugar
  • 4 ounces dark brown sugar
  • 1 large egg
  • 0.7 ounce whole milk
  • 1 teaspoon vanilla extract
  • 6 ounces semisweet chocolate chips

Procedure

  1. Take the butter and bring it to a boil on medium heat in a small pot/pan. Keep on letting it boil until you start to smell the browned butter and see it turn brown. There will be brown/black spots in the butter, which are toasted milk solids. Be careful not to burn them. You may choose to include them in your cookies – I did. Set aside to cool
  2. Put the butter in the mixing bowl and add both sugars. Mix.
  3. Sift the flour, salt, baking soda, and add it in 3 parts into the butter/sugar mixture.
  4. Crack an egg in a bowl, add milk and vanilla extract and whisk together. Add it to the dough. Mix thoroughly.
  5. Mix in the chocolate chips. Cover and chill in the fridge for an hour.
  6. Bake cookies at 375F for about 10~12 minutes, until the edges are a little darker.
Tagged , , ,

Ultimate Chocolate Cupcakes with Ganache Filling

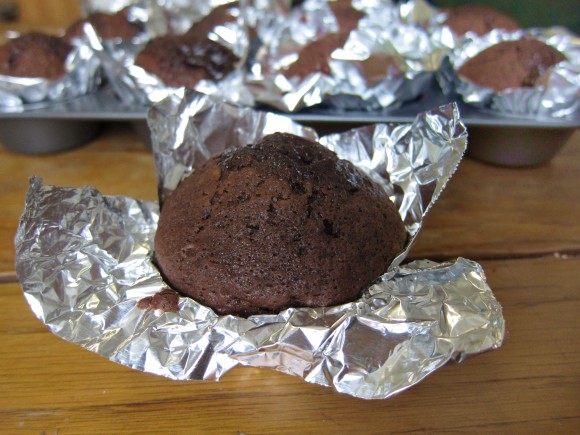
Ultimate Chocolate Cupcake with Ganache Filling 3

Finally, a second post for my Saturday Baking Project! I have been really busy previous Saturdays due to student org activities, and the products turned out not as amazing as I wanted it to be, so I didn’t post about it. This week, I chose a recipe from my The Science of Good Cooking cookbook, which is definitely one of my favorite cookbooks so far. I’ve been eyeing this recipe for a couple of weeks, and given that its the week of Valentine’s day, I think chocolate cupcakes are very suitable.

Ultimate Chocolate Cupcake with Ganache Filling 1

Makes a dozen

Filling:
2 oz bitter sweet chocolate, chopped fine
1/4 cup heavy cream
1 tbsp confectinoers’ or granulated sugar

Cupcakes:
3oz. bitter sweet chocolate, chopped fine
1 oz Dutch-processed cocoa
3/4 cup brewed coffee, hot
4 1/8 oz bread flour
5 1/4 oz sugar
1/2 teaspoon salt
1/2 teaspoon baking soda
6 tbsp vegetable oil
2 large eggs
2 teaspoons of distilled white vingar
1 teaspoon vanilla extract

Procedure:

  1. For the filling: Microwave chocolate, cream, and sugar in a medium bowl until mixture is warm to the touch, about 30 seconds. Whisk until smooth and then transfer bowl to refrigerator and let sit until just chilled, no longer than 30 minutes
  2. For the cupcakes: Line 12-cup muffin tin with paper or foil liners. Place chocolate and cocoa in a medium bowl, and pour hot coffee mixture and let sit, covered, for 5 minutes. Whisk gently until smooth, then transfer to refrigerator to cool completely about 20 minutes.
  3. Whisk flour, sugar, salt, and baking soda together in medium bowl. Whisk oil, eggs, vinegar, and vanilla into cooled chocolate mixture until smooth. Add flour mixture and whisk until smooth.
  4. Using an ice cream scoop or large spoon, divide batter evenly among prepared muffin cups. Place 1 slightly rounded teaspoon ganache filling on top of each portion of batter. Bake cupcakes until set and just firm to the touch at 350F, 17 t o19 minutes. Cool cupcakes.

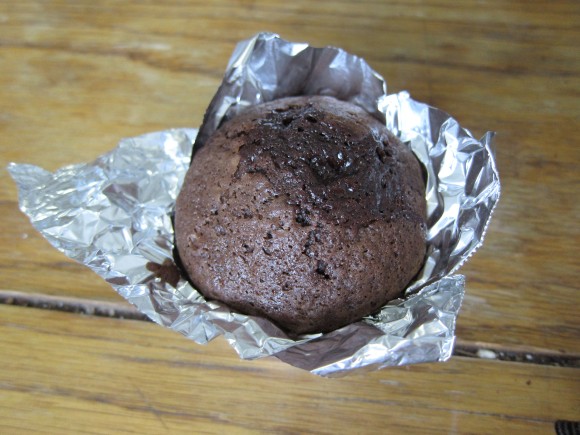
I thought it was a great recipe, mostly due to the ganache filling. I did not make the frosting because I was lazy. Reading the recipe now, I realized that I forgot cocoa powder, which is why the cake lacked a deep chocolate flavor. The recipe called for distilled white vinegar, but I didn’t have any on hand so I used rice vinegar, so maybe that’s why it tastes strange. I also didn’t have vegetable oil so I used olive oil… but that’s okay, the delicious ganache filling made up for it. Despite the flavor being off, it was a tender and moist cake. I’m sure the cake itself is a great recipe if I actually did it right =(. I’m not the brightest during the early hours of Saturday morning.

Look at the bubbly ganache filling!

Look at the bubbly ganache filling!

I have to warn you though: wait for it to cool before eating! As much as ganache delicious, burning your tongue on hot ganache is not.

Tagged , , ,

A simple bar

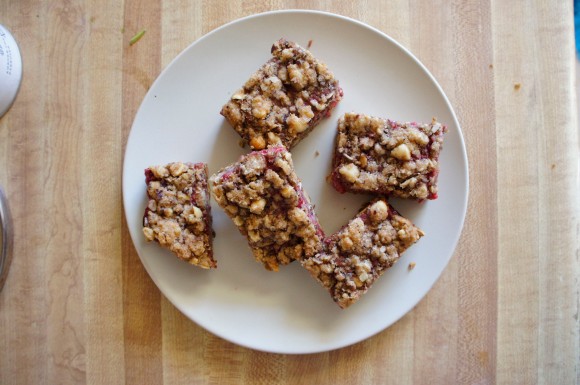
I don’t like easy pastries. I like elaborate procedures and many components. Yet, something possessed me to want to make Raspberry Hazelnut Bars from Cook for Your Life. Maybe it was the raspberry with hazelnuts, or maybe it was just the hazelnuts (Nutella anyone?), but I made this simple recipe a few nights ago. And, just as expected, they weren’t particularly exciting. I’m not sure I like them so much because the texture of the bar is very gritty. Flavor-wise though, it was spot on. The butter, brown sugar, oats and hazelnuts were complimentary, and adding raspberries gave it depth. Still, texture is important to me and I wasn’t fond of it.

Raspberry Hazelnut Bars

Crust:

  • 1 cup hazelnuts
  • ¾ cup whole wheat pastry flour
  • ¾ cup rolled oats (old fashioned oats)
  • ½ cup brown sugar
  • ½ teaspoon cinnamon
  • ½ teaspoon salt
  • ½ teaspoon baking powder
  • ¼ teaspoon baking soda
  • ½ cup (1 stick) unsalted butter, cut into 1-inch pieces

Raspberry Filling

  • 2 tablespoons maple syrup or brown sugar
  • 1 tablespoon whole wheat flour
  • 12 oz raspberries

Procedure:

How to Make Raspberry Hazelnut Bars

  1. Roast the oats and hazelnuts until fragrant in a 350F oven, about 10~15 minutes. Chop up the hazelnuts into chunks.
  2. Bring together the dry ingredients (flour, sugar, salt, baking powder and baking soda) and mix. Add the butter and mix until it forms a sandy mixture. Add the oats and hazelnuts and mix well.
  3. Reserving 1 and 1/2 cup of the dough, pat the dough into a 9×9 inch pan. Blind bake for 10 minutes at 350F.
  4. To prepare the filling, mix together the brown sugar and flour. Using a fork, introduce the berries a few at a time and crush it against the bowl.
  5. When the crust is slightly cooled, pour the filling on top and sprinkle the rest of the dough on top of that. Bake for 30~35 minutes or until filling bubbles and top crust has browned.

I kind of felt like my bars had a lot of raspberry filling compared to the photos from the recipe

These ended up getting sent to my friend’s workplace, and apparently they were a big hit! Give this recipe a try and tell me what you think =)

That’s my early morning cup o’ joe right there

Tagged , , ,